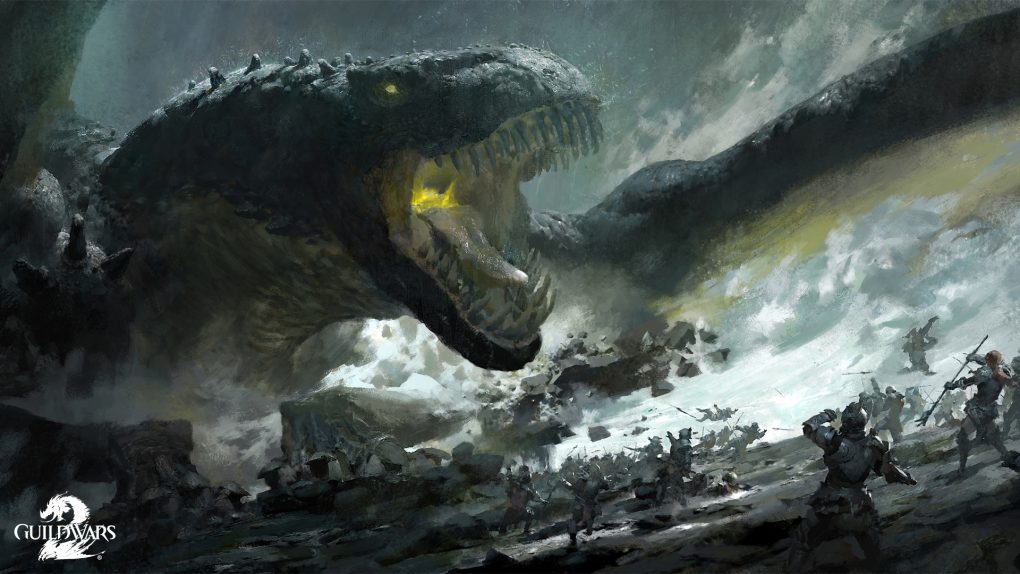
At the bottom of Sparkfly Fen dwells a beast feared by many. It has been terrorizing the civilians residing in these parts for some time, and it seems to be getting worse. Some say the power of this beast has been growing due to the assaults in Oor, but so far that seems to be just a rumor. Or is it more?
In this guide, I’ll discuss the basics of taking on the World Boss Tequatl the Sunless,The Champion of the Undead Dragon Zaihtan. Found in the Sparkfly Fen map in the Splintered Coast area. This walkthrough will help new comers to the battle have a better understanding of the event and what they will expect to come across. I’ll do my best in explaining certain details, but I’ll be focusing more on the bare minimums. If you haven’t taken on Tequatl since it’s “Tequatl Rising” revamp, this fight might seem a little different than what it was during the first years of the games launch. It’s much more engaging and requires players to work together in order to succeed.
Like many world bosses, Tequatl the Sunless runs on a timer. Triggering every 2 to 4 hours depending on the time of day. Here’s a nifty event timer that can help you keep track of when theses bosses will go up, just click on your server and your golden! EVENT TIMER The best time to do this event is usually at 7 o’clock/6 o’clock depending on your time zone really.
It’s recommended that your character be at level 65 or higher when attempting this battle. You can try your luck if you’re a little lower than that, but it seriously won’t go well for you. Also, due to the massive hype over this boss, it’s highly recommended that you enter the Sparkly Fen map at least an hour before the battle begins so you can secure yourself in a good map that will be filled with players. The more players there are, the better chances you’ll have at this event succeeding. The servers fill up fast so first come first serve!
Attempting the Tequatl battle for the first time can seem somewhat intimidating and long, but this fight is pretty straight forward and easy to get the hang of. This is one of those fights that everyone flocks to. It’s a lot of fun and the potential rewards you can get are well worth it. I’ll talk about the rewards a bit later. This fight also gives you the chance to clear its personal achievement track which awards you a title when all 10 achievements are completed. Again, I’ll get into that a little later. For now, lets get down to business <3
– Defeat Tequatl the Sunless – Timer: 15:00
For convenience sake, I’m going to put a short reference for the assault and turret team that will be attacking, what their roles are and what should be going on.
Assault Team
- A Commander should be leading the assault. Watch for their tag and rally on them. Stack and target on Tequatl and have all turrets fire skills 3, 4 and 5.
- Warriors and Guardians are best served at the right foot of Tequatl. They’re much more powerful and can take a hit. Everyone else should put some distance from the main rally and attack with long ranged weapons.
- The classes that are able to should have AoE condition removal skills when Tequatl throws down cripple fields.
- Elementalists should equip Conjures Frost Bow for others to pick up. Attack using skill 4 at a time when Tequatl isn’t attacking (30 second stun he endures when the megalaser fires)
- Warriors should equip Battle Standard banner for its AoE revive and damage increase.
Turret Team
- Three parties should form to defend each set of turrets.
- One member should man the turret while the others defend and repair when needed.
- The Risen mobs that spawn scale to the number of people that are around the turrets, so no more than 10 to 15 players should be around the turrets. If there are too many at the turrets area, Elite and Champions will begin to spawn.
The most important thing to remember is keeping the turrets up and firing and staking on the Commander. If there are players that are down, quickly pick them back up and return to the battle. Using revive skills is important if there are more than a few downed players. Fully downed players should not be revived. The fastest way to get back into the battle is to use the Brooloonu Waypoint and make your way back to the field. Trying to revive dead players takes too long to do and endangers the other players.
Phase 1: Tequatl’s Stationary Attacks
The battle will begin when you hear one of the fellow Quaggan swim to shore and shout “There’s something in the water!” Prepare yourself, cuz here comes Tequatl. Once Tequatl touches down, target his right foot and unleash on him. Right as he lands he will instantly attack by stomping his foot down causing a large wave to come crashing against you. This first wave is a bit hard to dodge, so don’t feel too bad if you can’t. Through the course of this phase, he’ll just bombard you with a flurry of different attacks. My advice for this phase is to always keep your eyes on the ground and listen.
Some of the Hylek will alert you to his attacks, so make sure you’re paying attention. What Tequatl will usually do is stomp on the ground with his feet causing a wave to come at you. He’ll do that about twice in a row. You want to jump right before the wave comes within two feet of your character. It’s easy to get the hand of after a while. You can also dodge roll into the wave, but I find that a little hard to perform. If you aren’t able to jump over the wave, your character will be knocked down. This push back doesn’t do too much damage to you, but it does take a few seconds for your character to get back on their feet.

Make sure you aren’t standing in one place for too long if your fighting from long range. Tequatl’s most dangerous attacks consist of throwing multiple area of effect fields on the ground that pulse ever second dealing damage and inflict Crippled with each pulse. Standing in these red circles for too long will seriously hurt you and before long you will immediately be downed. Due to the constant damage you’ll be taking while in the AoE, it will be almost impossible to get yourself back up. Chances are your character will die. Don’t wait around for someone to revive you. As stated before, it will take too long for others to revive you and they’ll be in danger of going down themselves. Take the Brooloonu Waypoint to get back into the field, the Splintered Coast Waypoint will be contested and useless.


Tequatl will at times let out a long roar that causes poison and fear for 5 seconds every 1 second. Again, the Hylek will warn you of this attack (when he’s “about to breathe”). You can easily dodge this attack if you time it right, but it’s more than likely always going to hit you. When this happens, your character will be feared and sent running away from the field. Sometimes you wont go very far, other times you’ll be running half way across the area. This attack can be one of those things to be great full for. If you’ve taken a bit of damage it’ll give you the chance to get away and slowly start gaining your health back.
There will be multiple times when Tequatl will sink his fingers into the ground and unleash long whip like bone structures called Tequatl’s Fingers. They always spawn in the same fixed place, so when they Hylek make note of this attack, watch for the fingers and quickly get rid of them. They constantly whip out and knock down players, and they also throw AoE fields of damage. Those manning the turrets can use their Poison Cleanse skill to remove them.

The Dragon Barrage is a frontal attack where Tequatl launches large nail like projectiles at random players that knock them back when hit. This attack doesn’t do too much damage and isn’t anything to really worry about.
You should never, at any time, be standing directly underfoot of Tequatl. He will deal an immense amount of point-blank damage around the areas right by his feet. This occurs when he’s walking or adjusting his position. This also deals a lethal amount of damage when the fight transitions from phase 1 to phase 2.
Keep track of Tequatl’s health. By this time as everyone is attacking, his health will have gone down a bit. At ever 25% of his health that goes down, the second phase of the battle will begin. Tequatl will become invulnerable when this occurs and he will launch forward and fly off towards the sky. Once you see that invulnerability on his health bar, get away from the area and make your way to the jump pads that will take you to the megalaser and the batteries. Be careful, because once Tequatl fly’s off, his feet will stomp down and cause a wave to come crashing against you. During this time you also want to be mindful of where you walk. Whirlpools will form around the area called Watery Grave that pulls the player into an under water area of the field. You will take damage while in this area, so quickly swim to the surface where you’ll see a patch of light to break back up into the surface.
– Defend the Megalaser and the Batteries in the East, West, and North – Timer: 2:00 – 3x
The second phase of the battle is now underway. At this time, you will need to choose whether you want to defend the megalaser or either of the batteries. Everyone in the battle will most likely already know what it is they want to defend, so pick one and prepare. Each objective has its own mechanics, and it’s own life bar:


Phase 2: The Megalaser and the Batteries
- Megalaser: The megalaser will be bombarded by risen coming from the northwest and northeast. Champion Risen Krait Hypnosses will spawn a few times from the north set of Hylek turrets. When the champion spawns, stop attacking the normal risen and take care of it quickly.
- West Battery: Waves of risen krait will spawn on the rock along with Tequatl’s Fingers that will throw poison at the battery. Focus on the fingers when they spawn.
- North Battery: Risen Hylek and Quaggan will spawn around the edges along with risen grub holes that will constantly pop up from the ground. When those holes pop up, make your way toward them and stomp them down. If they aren’t taken care of, Veteran Risen Grubs will spawn and spit poison around the area.
- East Battery: Regular risen will spawn along with Plague Carrier Abominations at different fixed locations. Make sure to take care of the Abominations quickly or else they will explode and leave a powerful damaging AoE field on the battery.
Each battery can be accessed by a jump pad. There is a diamond on each pad that will point you in the direction you will go.
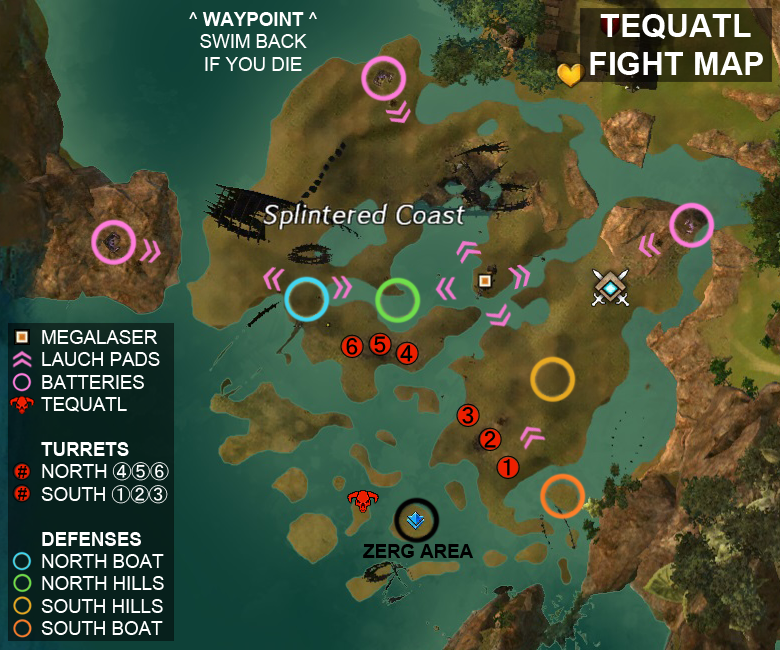
Image from Google (ttsgamers.com)
It would be wise to start heading back to the original battle area during the first phase at around the 10 second mark of the timer. Once time runs out, the megalaser will fire and hit Tequatl, sending him crashing to the ground. He will be vulnerable at this time and wont attack for 30 seconds. He will take 5x more damage so make sure to rally on the Commander and stack on the target at his right foot.
If performed correctly and everything goes smoothly, this phase will be done 2 more times (a total of 3). At the third and final one, his health will be nearly gone, so make sure to unleash on him until he is finally defeated. That’s pretty much all there is to it! Congrats! You’ve just beaten Tequatl the Sunless! This battle is a daily for me, it’s just too much fun.
– Rewards: The Boss Chest and the Dragon Chests –
Now, lets move on to the rewards you can get from this event. The main reason everyone flocks to Tequatl is due to the rare and exotic items you could get, along with the new Tequatl only rewards. The Dragon Chests are awarded according to the amount of damage Tequatl took during the Defend the Megalaser phase. At 75% health, you are awarded the Fine Chest, at 50% the Masterwork, and at 25% the Rare and Exotic. Each Dragon Chest can only be awarded once a day. You can do the event as many times you want, but the Dragon Chests wont be received if you already did the event and got them previously. These are the possible items you could get within theses chests.
World Boss Chest:
- Wings of the Sunless (Backpiece item)
- Miniatures:
- Mini Risen Thrall
- Mini Risen Brute
- Mini Risen Plague Carrier
- Mini Risen Abomination
- Mini Risen Hylek
- Mini Tequatl the Sunless
- Rune – Superior Rune of the Sunless
- Breathing Apparatus:
- Benthic Aquabreather (Light)
- Benthic Waterbreather (Medium)
- Benthic Hydrobreather (Heavy)
- Accessory:
- Bone Fragments of Tequatl
- Fang of Tequatl
- Ascended Weapon Chests:
- Angchu’s
- Beigarth’s
- Chorben’s
- Ebonmane’s
- Grizzlemouth’s
- Hronk’s
- Keeper’s
- Leftpaw’s
- Mathilde’s
- Occam’s
- Soros’s
- Stonecleaver’s
- Tequatl’s Hoard (Very rare chance)
- Theodosus’s
- Tonh’s
- Wupwup
- Zihtl
- Zojja’s
Dragon Chest:
- Fine Chest:
- 1 silver
- Taste of Liquid Karma
- Gilded Coffer
- Random weapon or piece of armor with Masterwork Rarity or above
- Masterwork Chest:
- 1 silver, 50 copper
- Swig of Liquid Karma
- Gilded Coffer
- Two random weapons of piece of armor with Masterwork Rarity or above
- Rare Chest:
- 2 silver
- Swig of Liquid Karma
- Gilded Coffer
- Random weapon or piece of armor with Rare Rarity or above
- Exotic Chest:
- 1 gold, 2 silver
- Sip of Liquid Karma
- Dragonite Ore (20)
- Three random weapon or armor with Rare Rarity or above
- Chance of Ascended Weapon Chest (same as above)
- Slightly higher chance at Tequatl’s Hoard weapon chest
As you can see, the Ascended Weapon Chests are highly coveted. Tequatl’s Hoard even more so. The Tequatl weapons are exactly like normal ascended weapons, yet they have their very own effect on them. They produce whispy black smoke when wielded and their amazing black and green color scheme is very eye catching.
You will also be awarded Experience, Karma and Coin based on how well the events went. The rewards are:
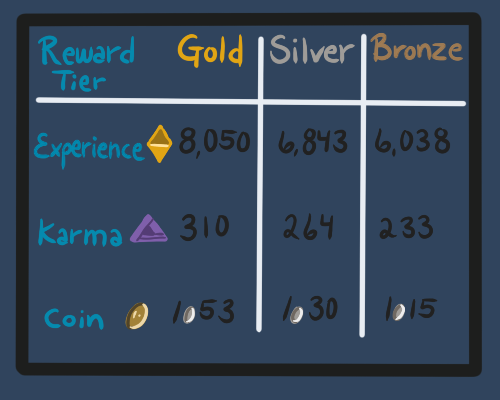
Well! I hope this was helpful to any and all who happened upon this. It’s not as detailed as all the other guides out there, but I went with the simple and easy to understand way. I personally find this way much easier to follow. Now I know I said I’d talk about the Tequatl the Sunless Achievement Track, but I think I’ll save that for another post. This one has gone on for too long. I’ll see you all in the next post!